A Few Tricks
by George Lanthier
This is an article about a few tricks that just might come in handy for you sometime. The first one features my fictional buddies, Bruce and Bubba in an older adventure that is still very much current in content.
Bubba is on what was supposed to have been the last call of the day when he comes across a plugged boiler. The boiler and fluepipe are completely covered with soot and, on top of everything else, the soot appears to be oil-soaked. Bubba calls Bruce, very upset since the whole situation is not making for what he hoped would be a fast get-away.
“Hey Uncle Brucie, it’s me. You’ve gotta be kidding me, right? I told you I had to get out on time tonight. I got tickets to the Red Sox game. This damned boiler is plugged and it looks like it hasn’t been cleaned since it was put in. On top of that, there is oil everywhere from the chamber to the smoke pipe! Give me a break, will ya?”
“Take it easy,” advises Bruce. “You’re right. That boiler hasn’t been cleaned since it was put in because it was put in last week. Do me a favor and at least pull the burner, the front mounting plate and the fluepipe. Then you can take off and I’ll finish cleaning it. And besides, I didn’t give it to you as a cleanout, the call came in as a ‘smells’ oil call. I’m on the way.”
When Bruce arrives, Bubba has the unit opened up and has begun to clean it. The fluepipe is on the floor and so is the burner and front boiler plate. “Thanks for getting things started for me,” says Bruce. “If you want to go now, go ahead and I will finish up. Boy, it is a mess, huh?”
“Boy, you’re not kidding. I wonder what went wrong anyway,” says Bubba. “If this unit was only put in last week, something went screwy and all of the soot is oil soaked too? I think I’ll hang around for a few more minutes and give you a hand. I also want to see what you find. The big thing I’m worried about is how we’re gonna clean up the boiler. I can barely get a brush through it. It’s like tar.”
“You’re right Bubba, it is like tar but let’s get as much out as possible. Then we can light it off and see what was wrong with the burner.” answers Bruce.
“No way Uncle Brucie. You’re gonna light this thing off? This I gotta see! This thing’s still wet with oil! I wouldn’t miss this for anything. The game can wait. I’d rather watch you burn down the house!” exclaims Bubba.
Bruce fires back with, “I’m not going to burn the house down, but I do need something out in the truck. Be right back.”
Like Bubba, you are probably asking yourself, “Has Bruce finally lost it?” No. This is where the ‘trick’ comes in. What Bruce has gone out to the truck for is a dry chemical fire extinguisher, Figure 1. This can be “Ansul powder” or “Purple K” or any of the known fire extinguishing powders. Bruce proceeds to shoot the extinguisher onto the chamber area and fluepass walls and also through the smokehood. The fluepipe has been cleaned out and wiped with rags. More powder has been applied to the fluepipe using rags.

It’s now time to fire off. What’s hopefully going to happen on light-off is that the dry chemical is going to act as it should, as a fire retardant. This will burn off the oil slowly but still allow the unit to operate safely. One other thing must be done, however. Any and all refractory materials must be removed during cleaning and dried out separately or disposed of properly. In the case of wet-base boilers, they can be run until all of the oil is burned off. In a dry-base boiler, the chamber should be replaced to insure a safe light-off.
The boiler is closed up and the burner is fired. “Wow, look at that, will ya!” exclaims Bubba. “A slow burn and no flashback or a fire out of control. I’m glad I hung around. It was worth it. I’ll probably only miss the first innings of the game, anyway. See you tomorrow Uncle Brucie.”
Here’s another trade secret and one of the favorites on our bulletin board (DragonTalk) at my website. For many of you, this next trick will be a very familiar one and you may wonder why I would write it up. Please keep in mind that some of us do not know everything. Also, thankfully there are some new people who have just joined us. For their sakes, on to trick number two.
The problem here is that the customer has broken an old oil valve and nipple completely off the oil tank outlet. He has had the common sense to drive a stick into the remains of the tapped ferrule (or boss); therefore, the leak is merely a small drip. Golf tees are good for this too!
Your job, should you decide to accept it (hah!), is to replace the nipple and valve, remount the tank filter, and go on to your next impossible mission. Right?

In Figure 2, we show a vacuum cleaner just like the one in the back of your van and we have removed the debris bag. “Why remove the bag?” you ask. We want all of the suction we can get out of it. Also, the hose must be in good shape, not repaired with duct tape every three inches.
The hose is connected to the vent (preferred) or fill pipe and the remaining pipe is air sealed. The vacuum cleaner is now turned on and voila! The oil is held in suspension in the tank. You can now remove the broken nipple, repair any damaged threads and re-pipe the tank. Pretty slick, or what?
A few words of caution. Do this only to tanks of 12-gauge steel or thicker, do not attempt this with 14 gauge or thinner tanks! With the thinner tanks, you won’t have any problems when you first turn on the vacuum and pull in the sides of the tank with the oil left in it, but when you shut off the vacuum cleaner and release the tank sides, you may pop a weld or worse. If you destroy the tank, you also get to clean up the mess. Remember 12-gauge tanks or thicker only.
Also, be careful with full tanks since they will be more difficult to pull a vacuum on; in some cases, it may not work at all. Be sure to place the vacuum cleaner well above the top of the tank since you do not want to get any oil in either the hose or vac.
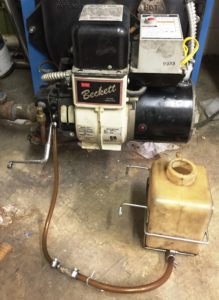
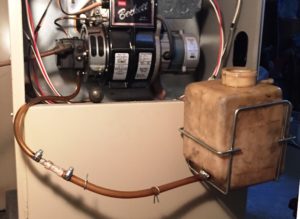
This next trick comes from Steve Martino of Martino Fuel. This is his way of making a “power vacuum bleed” much easier by using a “priming tank” and where the teacher becomes the student. In Figure 3, Steve’s device is shown on a boiler sitting on the floor. It’s also shown in use on a furnace in Figure 4. Steve wrote me about this great little trick with these very nice words; “For me, I’ve learned many great and wonderful things from your books. They have made be a better mechanic. If there is one tip that really helped me out of nuisance calls on the fuel side of things, either from my customers or someone else’s, it’s your tip and procedures for power bleeding. My biggest concern was leaving the heating unit to go back to the tank, and worrying about overfilling, or the can tipping over, or the hose knocking the can over. etc. Thanks for sharing your knowledge, you are the inspiration for this little device.”
And thank you Steve for sharing this with us. For the record and especially for those of you in Massachusetts, Steve works in the Philly area of Pennsylvania and the use of “Firomatic” valves only went into the National Code (NFPA31) within the last few years and in addition Code enforcement in Pennsylvania is not as stringent as elsewhere. And that’s why they’re “missing”.
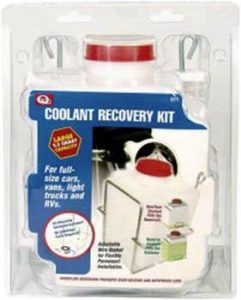
What Steve’s great little idea does is make the “power vacuum bleed” very easy. The trick is to build a “priming tank” from just a few parts that can be put together for under $20.00. The tank is from Interdynamics and sold as a “2.5 qt. coolant return kit for larger vehicles”, Figure 5. Steve bought his at Pep Boys, I got mine at Auto Zone and you can also find them on eBay and Amazon for $9.99. It comes with the tank, the bracket and some 3/8” hose. To complete the tank and to make it work you need to buy some ¼” hose (10-foot roll) and a 3/8” x ¼” splice piece. Those two items cost me $9.00. Here’s the procedure for the “power vacuum bleed” again.
First of all, let’s make a few observations. Did you ever notice that pump manufacturers always tell us to use a bleeder hose when bleeding a pump? Have you noted that they recommend that you only open that bleeder a ¼ to ½ turn? Have you also read somewhere that they want the end of that hose in a supply of oil? Well, here’s why.
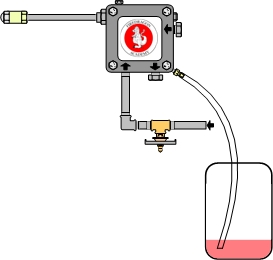
The idea behind the bleeder, the hose, Figure 6, and the smaller hole is very simple, it’s to keep the pump and the liquid from picking up anymore air by creating a closed system. Putting the end of the bleed hose into the liquid creates that “closed system” and also keeps the air out and the problem away, more air. If you have a hole and it’s open to atmospheric pressure (14.6 psi), do you think air is trying to get in as you are trying to get air and oil out? Think about it.
The proper and only way to bleed a pump, the oil line, and everything else all the way back to the tank is the following:
- Make sure the pump is full of oil, if you have to fill it!
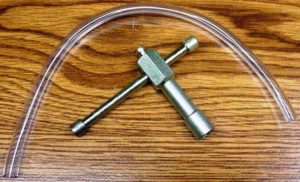
- Place the hose over the bleeder. A device like a Bleed Wrench, shown in Figure 7, works great for this. Open the bleeder only a ¼ to ½ turn. Make sure that the open end of the bleed hose is immersed in oil in your pail or bucket to create a closed system from the ends of that hose to the oil in the tank (this is where Steve’s tank is a clincher).
- Close the inlet valve at the pump and start the burner.
- Wait until the pump starts to whine. If you had a vacuum gauge inserted at this point it will show 20″ to 25″ of vacuum. By the way, if the hose starts to have white smoke coming out of it, you didn’t fill the pump and it’s burning up, ooooops! The old timers used motor oil to start and prime new pumps on stubborn jobs and as usual they were right, more lubrication and viscosity. On tough bleeds or new lines start by closing the valve at the tank and again thanks to Steve’s “priming tank” a piece-of cake.
- Open the inlet valve and watch what comes through the bleeder for several minutes. Normally if this was a tune-up you would see some oil, then lots of bubbles and then air free oil.
- Once it’s bled out, close the bleeder with the pump running and you’ve now done a “power vacuum bleed”. DO NOT SHUT OFF THE BURNER while priming.
A lot of people will tell you overhead lines won’t work–that’s just BS. That fact is it’s just a siphon–it always works. If the oil tank level is at or higher than the pump, it has to work, that’s physics, but bleeding the system this way makes the pump’s work a lot easier.
I guess I should also mention that some of the same people who knock overhead lines and don’t believe in siphons do believe in the Easter Bunny and are the same ones that will also tell you that oil safety valves (osv) don’t work. If you have gravity flow an osv will work; if you have a pure lift job, you don’t need one. There are some basic guidelines for the proper use of the osv and every device we use and the correct information comes from the people who make them. If you “power vacuum bleed’ everything and get into the habit of doing it, even on gravity jobs, you’ll never have a priming or air problem again. I guarantee it!
Finally, and hopefully once and for all here’s the definition of a siphon right out of the dictionary; “a tube used to convey liquid upwards from a reservoir and then down to a lower level of its own accord. Once the liquid has been forced into the tube, typically by suction or immersion, flow continues unaided”.
By the way, that bled oil can be stored in the priming tank and used to prime and fill the filter(s) on the next job, it’s just good fuel oil. End of story and thanks again Steve!
See ya!
*George Lanthier is the owner of Firedragon Academy, a 25-year-old Massachusetts Certified School teaching both gas and oil and other heating subjects. Firedragon Academy has its hands-on training facility in Sturbridge, Massachusetts at the Beckett Training Center. Firedragon is also a publishing firm publishing George’s over 60 books and manuals on HVAC subjects. He is a CETP, NATE, NORA, PMAA and PMEF Proctor and has been a Massachusetts Certified Instructor since 1975. He can be reached at 608 Moose Hill Road, Leicester, MA 01524. His phone is 508-421-3490 and his website can be found at FiredragonEnt.com